
Role Play Overview
There are two Brevity concepts that comprise a role play:
- A course provides the basis for the content of the role play conversation. It includes components that control the topic of conversation, progress milestones, AI persona, and more.
- An assignment is based on the course, and it is the method by which users encounter and conduct a role play, as well as the method by which results and progress are tracked.
As a result, creating a role play involves both creating a course and creating an assignment based on that course.
Creating a Course
Creating a course involves five steps:
- Entering Basic Info
- Selecting a Context or Contexts for the course
- Selecting Topics for the course (optional)
- Selecting a Persona or Personas for the course (optional)
- Reviewing and creating the course
Note that while you can quickly create new courses by cloning and editing existing courses, the steps below cover creating a new course. For more information, see:
To begin creating a course, navigate to the Courses page at either the All Organization or a specific team level, and click Create Course. The Create New Course workflow appears.
Entering Basic Info
The first step in creating a course is entering basic information about the course.
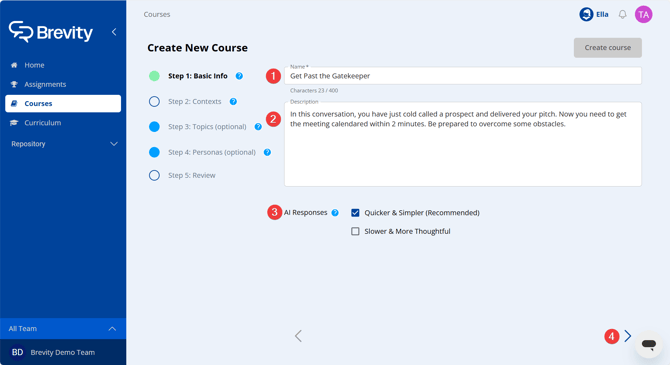
- Enter a name for the course.
- Enter a description for the course. This description appears alongside the course name on the Courses page.
- Select an AI Response method:
- Quicker & Simpler (recommended): The AI typically responds in less than five seconds.
- Slower & More Thoughtful: The AI takes longer to respond, but the responses are longer and more thoughtful. This is not worth the tradeoff in responsiveness in the vast majority of cases.
- Click the right arrow icon or click Step 2: Contexts to proceed to the next step.
Selecting a Context or Contexts for the Course
Contexts include information about the type of conversation, instructions to the AI persona about how to conduct the conversation, and progress milestones that determine whether the conversation is successful. Note that you can select more than one context for a course. When a course includes multiple contexts, users can select from the available contexts each time they perform role play built from that course.
On the Contexts page, all existing contexts appear. Select one or more contexts by clicking on each context to include in this course.
Depending on your role, you can also create a new context or edit an existing context. For more information, see:
Selecting Topics for the Course
A Topic is a specific point of conversation to be included in a role play. Topics are not mandatory, but including a topic in a course will ensure that the topic comes up as part of the role play conversation.
On the Topics page, all existing topics appear. Select one or more topics by clicking on each topic to include in this course.
Depending on your role, you can also create new topics or edit existing topics.
To create a new topic, click Create New, enter the text of the topic, then strike the Enter key to save the topic.
For more information about creating and managing topics, see:
Selecting a Persona or Personas for the Course
A Persona is an AI character that Brevity users interact with as part of a role play conversation. Adding a persona to a course is optional, but adding a persona allows you to align the context of the conversation with a realistic conversation partner that represents a relevant industry, role, or personality type. If no persona is selected in a course, the resulting role play conversation will select one of the created personas at random.
On the Personas page, all existing personas appear. Select one or more personas by clicking on each persona to include in this course.
Depending on your role, you can also create a new persona or edit an existing persona. For more information, see:
Reviewing and Creating the Course
The final step is reviewing the various components that you have selected for the course, then clicking Create Course to make the course available on the Courses page.
Creating an Assignment
You can create an assignment from any available course. The resulting assignment will appear on the Assignments page for all assignees, where they can practice the role play and track their results and progress. Assignees will also receive reminders about their assignments in any Digest emails that are enabled in your instance.
Before creating an assignment, it is important to note which team you currently have selected in the bottom-left corner of the Brevity page. Assignments that are created at the All Organization level will not be associated with any specific team in analytics. If you want to track results at the team level, we recommend creating assignments within each team.
Note that you can create an assignment from both the Courses page and the Assignments page.
To create an assignment from the Courses page, click the three-dots menu to the right of the course you want to use for the assignment, then click Create Assignment.
To create an assignment from the Assignments page, click Create Assignment.
In either method, the assignment settings window appears.
The assignment settings window allows you to designate assignees and customize the parameters of the role play for users.
Enter a name for the assignment and select the course that the assignment will be built from.
Next, select the assignees in the Assignees drop-down. Note that you will see only users who have been added to the team you currently have selected. So if you are working at the All Organization level, you will see all users, whereas if you are working in a team, you will see only users in that team.
Set conversation goals for the assignment at the bottom of the assignment settings window. The goal represents the target frequency with which assignees should perform the role play.
Other settings allow you to change the available languages for the assignment and control the behavior of the AI persona. For a detailed breakdown of all assignment settings fields, see:
Before finalizing the assignment, you have the option to notify assignees and include a message related to the new assignment.
When you have finished adjusting the assignment settings, click Create. The assignment will be available for assignees on their Assignments page.