
A group (also called a user group) is a named set of people in your organization. A group can include people from more than one team. Use groups to assign training to several people at one time and to filter Analytics.
Before you begin
-
Who can do this?
Only organization admins can create, edit or delete groups and change the people in a group. -
Who can be in a group?
Any member of your Brevity organization (organization admins, team admins and members), and any person with a pending invitation. -
What groups do not do:
-
They do not change the role or the permissions of a user.
-
They do not add or remove team memberships.
-
They do not invite new users to Brevity.
-
1. Open the Groups tab
-
Click your company's logo in the bottom-left of the Brevity window, then click View Organization.
-
Make sure that All Organization is selected.
-
Click the Groups tab.
-
Optional: to find a group, type its name in the Search groups box.
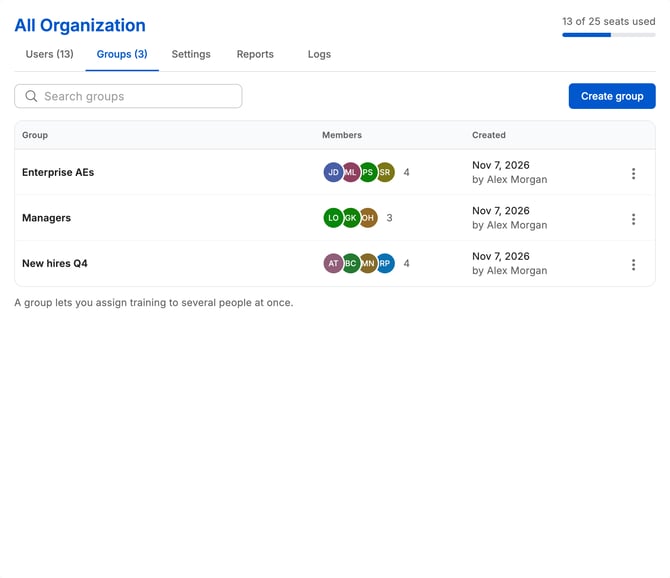
On a computer, the tab shows a table of groups. On a phone, it shows a list of cards.
On the Groups tab, organization admins can create, edit, delete and open groups.
2. Create a group
Create a group to collect a set of people, for example "New account executives (0–6 months)" or "Enterprise sales – North America".
-
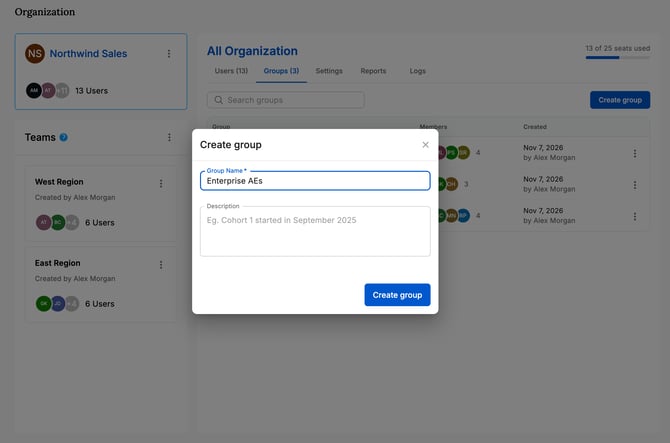
On the Groups tab, click Create group.
-
In the Create group dialog, enter a Group Name. The name is required. Examples:
-
New Hires 2026 -
Enterprise sales – North America -
Pilot Cohort – Q3
-
-
Optional: enter a Description, for example
Cohort that started in September 2025. -
Click Create group.
What happens next
-
The group shows in the list on the Groups tab.
-
You can use the group in:
-
The filters of Analytics.
-
The Assignment Creator (see "8. Create assignments for a group" below).
-
-
The group has no people at first. You add people in the next steps.
3. Edit the name or description of a group
-
On the Groups tab, find the group.
-
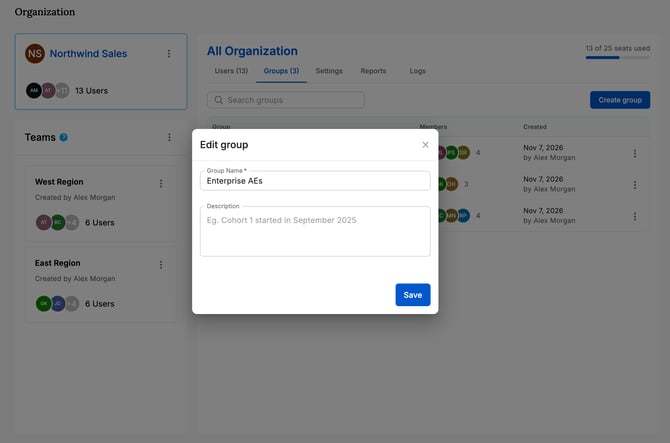
Click the three-dots menu of the group.
-
Click Edit.
-
In the Edit group dialog, change the Group Name or the Description.
-
Click Save.
Notes
-
The change shows immediately in all of Brevity. This includes the filters of Analytics and the assignment menus.
-
If another group has the same name, Brevity shows A group with this name already exists. Enter a different name.
4. Delete a group
When you delete a group, Brevity does not remove or deactivate the users in it.
Caution: If a saved filter uses the group, the filter changes to "All users" or shows that the group is not available.
-
On the Groups tab, find the group.
-
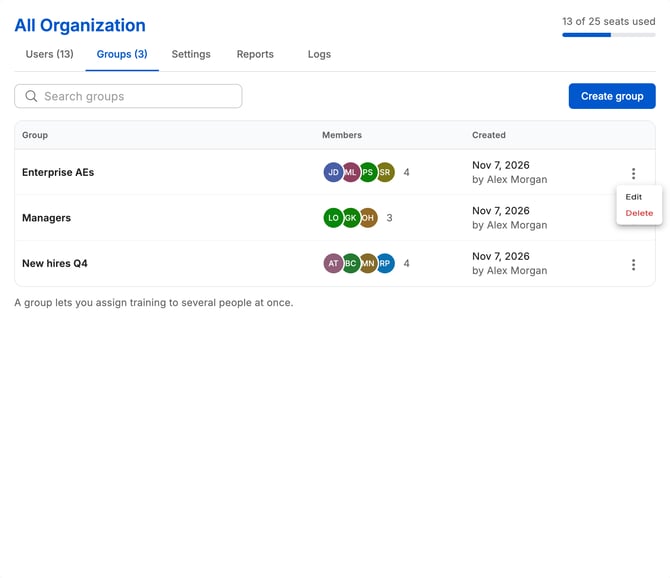
Click the three-dots menu of the group.
-
Click Delete.
-
In the Delete group dialog, click Delete.
What happens when you delete a group
-
Brevity removes the group from:
-
The list on the Groups tab.
-
The filters of Analytics and other selection menus, for example in the Assignment Creator.
-
-
The users stay:
-
In your organization.
-
In their teams.
-
With the same roles and permissions.
-
5. View the details of a group
The detail page of a group shows who is in the group. Use it to add and remove people.
-
Open the Groups tab.
-
On a computer, click the row of the group. On a phone, tap the card of the group.
The detail page shows:
-
The name and the description of the group.
-
A Back to all groups link.
-
A Users (N) tab with the people in the group.
-
An + Add Members to Group button.
-
A list of the people in the group, with the columns First Name, Last Name, Email, Date Joined and Status, and a menu for each row. If your organization uses external IDs, the list also has an External ID column.
Date Joined is the date that the person joined Brevity, or the date of the invitation for a pending person. It is not the date that you added the person to the group.
6. Add people to a group
You can add members of your organization and people with a pending invitation.
-
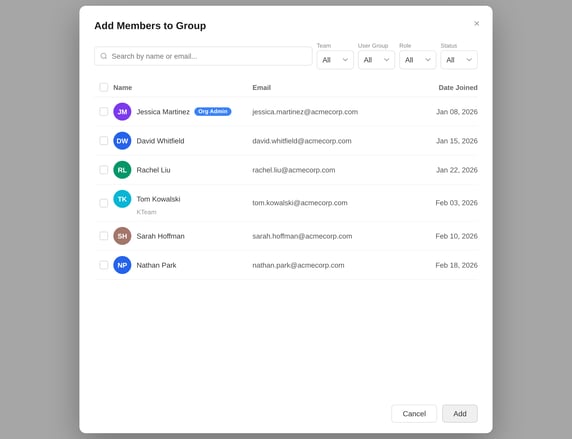
On the detail page of the group, click + Add Members to Group.
-
In the Add Members to Group dialog, search for and select one or more people. To find people, use the Team, User Group, Role or Status filter. The Status values are Active and Pending. If your organization uses scheduled onboarding, the values also include Scheduled and Draft.
-
Click Add.
What happens when you add people
-
Brevity adds the selected people to the group immediately.
-
The people keep their teams and roles. Their access does not change.
-
The list of people and the count of the group change immediately.
-
You can now use the group in Analytics and in assignments. Each admin sees only the people in the group that they can already see.
If Brevity cannot add the people, it shows Failed to add members to and the name of the group. Change your selection and try again.
7. Remove people from a group
When you remove a member from a group, Brevity does not remove them from Brevity or from their teams.
-
On the detail page of the group, find the member.
-
Click the three-dots menu of the member.
-
Click Remove from Group.
-
In the Remove Member from Group dialog, click Yes, remove.
Caution: For a person with a pending invitation, the menu item is Cancel Invitation. This item deletes the invitation from your organization, not only from the group. To continue, type the email address of the person in the Delete Invitation dialog and click Delete.
What happens when you remove a member
-
Brevity removes the member from that group only.
-
The member stays:
-
In the organization.
-
In their teams.
-
With the same roles and permissions.
-
-
The member is no longer included when you:
-
Filter by that group in Analytics.
-
Filter by that group in the Assignment Creator.
-
If Brevity cannot remove the member, it shows a "Failed to remove…" message. Try again.
8. Create assignments for a group
In the Assignment Creator, you can filter the list of people by group. Organization admins can use this to assign content to people across many teams in one step.
Note: When you work in a team, the User Groups filter lists only the groups for that team. Groups do not let a team admin see or assign people outside their teams.
Open the Assignment Creator
-
In the navigation bar, click Assignments.
-
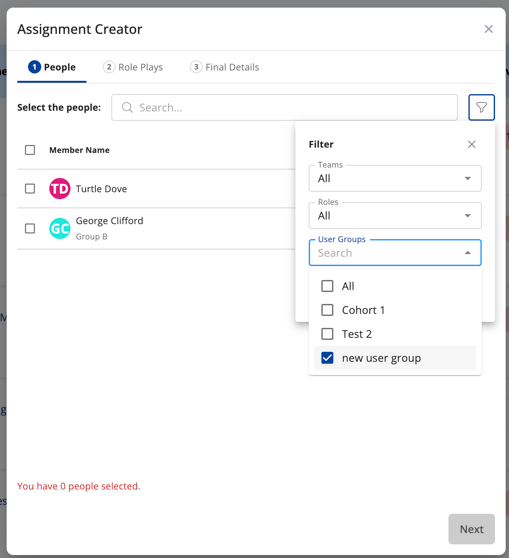
Click Create Assignment. The Assignment Creator opens on the People step.
Filter by group
-
On the People step, open the Filter menu.
-
In User Groups, select one or more groups.
-
Select the people in the list.
The list shows only the people in the selected groups. If you also filter by team, role or status, the list shows only the people who match all filters.
Complete the assignment
-
Click Next.
-
On the Role Plays step, select the role plays to assign. Click Next.
-
On the Final Details step, set the details of the assignment.
-
Click Create # Assignments for # People. The button shows the numbers of assignments and people.
What happens when you assign to a group
-
Each person that you selected gets the assignments.
-
These assignments are the same as all other assignments:
-
They show on the dashboards of the users.
-
They show in Analytics and scorecards. Each admin sees only the people they can already see.
-
-
If you add a person to the group later, Brevity does not give them the assignments that you created before. If you remove a person from the group, Brevity does not remove their assignments.
9. Use groups in Analytics and digests
After you create groups, you can:
-
Filter Analytics by group
On the dashboards that support it (Overview, Adoption, Engagement, Individual Progress and report cards), use the User Groups filter. The results show only:-
The members of the selected groups, and
-
The people that your role already lets you see.
-
-
Send a Member digest to a group (organization admins)
When you configure a Member digest, select a group as a recipient. Brevity sends the digest to each person in that group.
Related articles
To learn what groups are and how they work, see User Groups Overview.