
Creating an Assignment
In this article you will learn:
- How to access the assignment creator
- Step 1 - Selecting people for the assignment
- Step 2 - Selecting role play course(s) for the assignment
- Step 3 - Selecting assignment settings
Access the Assignment Creator
You can open the Assignment Creator in two ways:
Option 1: From the Assignments tab

Use this when you want to build an assignment from scratch.
- Go to Assignments.
- Click Create assignment.
The Assignment Creator opens at Step 1 – Select people (no role play pre-selected).
Option 2: From the Courses tab

Use this when you want to create an assignment from a specific course/role play.
- Go to Courses.
- Click Actions button (⠇) on the course of interest
- Click Create assignment.
Step 1 – Select People
Step 1 is where you choose who will receive the assignment. This step is designed for fast bulk selection using search and filters.
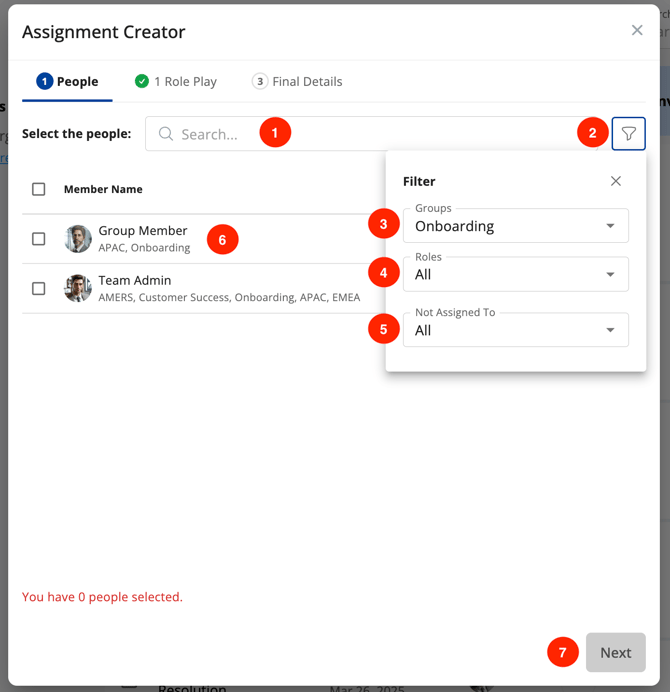
- Use the search bar at the top of the list to quickly find individuals by name.
- Use filters to narrow down your list of users
- Filter by Team membership
- Common use cases:
- Assign only to the Onboarding team for new-hire training.
- Assign to a specific region or segment that has unique messaging.
- Common use cases:
- Filter by Role - simplify your list by removing admins, if desired
- Filter by Assignment Status (“Not assigned to…”)
- Use this to find people who are not yet assigned to a specific course/role play.
- Common use cases:
- You’ve launched a new course and want to catch everyone who missed the original assignment.
- You’ve added new hires and want to make sure they’re added to existing programs.
- Select people
- Use checkboxes to select individual users.
- Combine multiple filters (e.g.,
Team = Onboarding+Role = Member+Not assigned to = Objection Handling) to build a very targeted list. - You can select as many people as you need for a single assignment.
- When you’re finished selecting people, click Next to move to Step 2 – Select role plays.
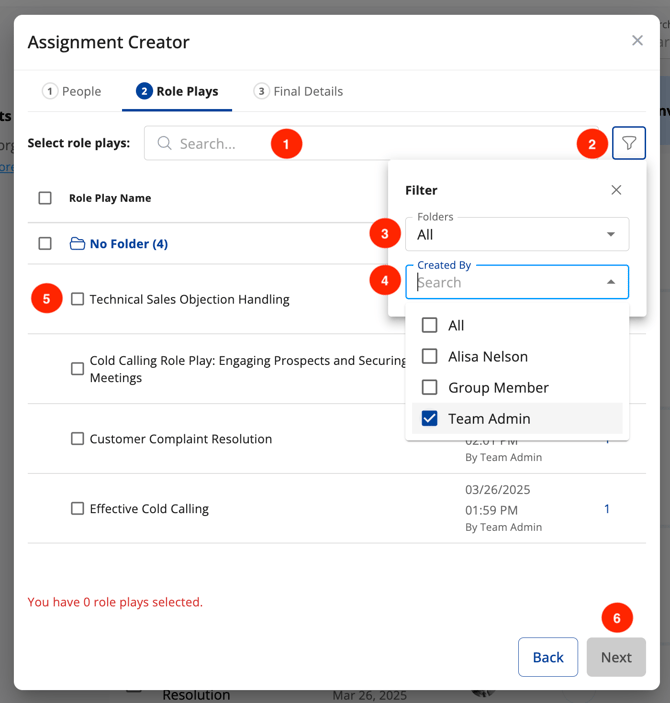
Step 2 – Select Role Plays
Step 2 is where you choose what users will practice.
If you launched the Assignment Creator from Courses > Actions > Create assignment:
- The associated role play is pre-selected in Step 2.
- You can:
- Keep that single role play, or
- Add more role plays by checking additional boxes in the list.
- Find role plays using search
- Use the search bar at the top of the role play list to search by role play name.
- Helpful when you know the exact scenario you want (e.g., type “Discovery – Mid-market”).
- Find role plays using Filters
-
Filter by Folder
-
Folders help you organize and quickly find the right content. You might have folders like:
-
By role:
Inside Sales,AEs,CS -
By call type:
Qualification,Discovery,Negotiation -
By training program:
Onboarding,Q1 Sales Play,Renewals -
By initiative:
New Product Launch,Competitions
-
-
Common use cases:
-
Assign all role plays in your Onboarding folder to a new-hire team.
-
Pull all Negotiation scenarios when running a focused skills sprint.
-
-
-
Filter by Creator
-
Use this when you want to focus on official, team-owned content and/or filter out member-generated role plays.
-
Common use cases:
-
Exclude member-created content (e.g., created via Ella or the course builder) when you’re setting up formal training.
-
Quickly find all role plays created by your enablement team or a specific program owner.
-
-
-
Select one or multiple role plays
-
Check the box next to each role play you want to include.
-
You can assign one role play or multiple role plays in a single assignment.
-
When you select multiple role plays, remember you’ll set requirements (e.g., how many conversations and how often) in Step 3.
-
-
When you’ve selected your role plays, click Next to move on to Step 3 – Final details.
Note: Assignment names are automatically created from the selected role play and cannot be customized when creating or editing an assignment.
Step 3 - Final Details
The assignment settings tab allows you to designate assignees and customize the parameters of the role play for users. See below for a breakdown of every configurable field in the Assignment Settings window.

Scripts can be directly configured in a Context Milestone or will be generated by the AI. Script generation will use items from your Knowledgebase to curate scripts during role play.
If no script or KB items are provided, the LLM will generate a script for you. If your Org has not yet completed Guided Setup or uploaded items to your Knowledgebase, it is recommended that Scripts mode remain off to prevent LLM hallucinations or inaccuracies.
- Assignment Name
- Available to customize during creation of a single assignment or to edit if creating multiple assignments at once. Defaults to the name of the selected role play.
- Scripts
- When enabled, AI-scripts are generated and presented to the user during the role play assignment. In "Scripts mode", users are assessed against how closely they follow the provided script. Brevity recommends disabling scripts except in specific cases.
- Hints
- When enabled, AI-generated hints are presented to the user during the role play assignment. These hints help guide the user through the milestones.
- None
- When enabled, users have to option to practice without hints or scripts. This is the required practice mode for muting the AI during a role play.
- Available Languages
- For Teams where Multi-lingual is enabled, language options will be available per-assignment. The displayed default languages are inherited from team or organization settings, but they can be customized for each assignment. For more information, see: Managing Languages for your Team
- In the Languages drop-down menu, select the languages in which users can complete the role play conversation. Languages
- Make Available for Phone-Based Role Play
- When enabled, this assignment will be available to users of Brevity phone-based role plays.
- User can Mute the AI
- When enabled, the User will see a mute button appear when hovering over the AI Persona's image inside the practice screen. Use of this feature requires that "Support" is set to "Unassisted" during the practice session.
- Allow pause during recording
- When enabled, the User will see a Pause button appear after recording begins. If they need to pause the session due to an interruption, to collect their thoughts, etc, they will have up to 15 minutes granted in 5 minute increments. If the time runs out without resuming or extending, or if all pause time is exhausted, the session will automatically end and progress saved.
- Allow audio-only recording
- When enabled, the User will have the option to turn off their camera for an audio-only practice. In the replay, the User's video will be replaced by their avatar.
- AI can end the conversation
- When enabled, the AI persona can end the role play conversation. This is useful in many scenarios, and Brevity recommends enabling this option in most cases
- Allow retries after hang up
- Appears if "AI can hang up" is enabled
- Gives the Assignee the opportunity to try again if the AI chooses to end the call
- Choosing to "retry" picks up the conversation right where you left off
- Give your users up to 5 retries per conversation
- Completion Criteria
- Select criteria for completing an assignment for all selected Users and role plays.
- Brevity supports score thresholds:
- Score above 85 in at least 3 sessions
- Score above 85 in 3 consecutive sessions
- Or complete the assignment by number of attempts only (total or consecutive).
- Recurring
- When enabled, a frequency dropdown appears (Daily, Weekly, Monthly). Recurring assignments stay re-practicable and track progress in rolling time windows instead of becoming one-and-done. Users and Admin will see progress relative to practice sessions within the recurring time window.
- Lock assignment after completion criteria are met
- When enabled, assignments are marked "completed" upon criteria being met for each individual assigned the role play. After completion, users will be able to review their previous attempts but will not be able to practice on that assignment.
Related Articles:
- Assignment Best Practices: Optimizing Assignment Strategy in Brevity: A Practical Guide to Scope, Targeting, and Content Setup
- Assignment-related Troubleshooting & FAQs